Posts tagged ‘beets’
Sage butter makes the Brussels better
Very often when I tell people that two of my favorite vegetables are beets and Brussels sprouts I get a look as if I just grew a second nose. “You can’t be serious” and “REALLY??!” are some of the most comment responses, along with “I can’t stand _____, I used to have to eat them as a kid, and….yuck!”
Sadly, I find that frequently both of these vegetables end up with an “F” grade because they aren’t cooked well AT ALL. Think of the last time you (or someone you know) cooked beets or Brussels sprouts. How many of you boiled a pot of water as the first step? If the second step was putting either of these veggies into that water, I can tell you already, you went wrong from the beginning.
You see, water is amazing. It gives us life, grows our food, washes away dirt and germs, however it can also steal away valuable and irreplaceable nutrients and flavor in cooking. With beets, this is easy to see. Almost immediately the water turns brilliant pink when beets are added. As you heat and boil these roots, the nutrients and flavors (especially the sweetness) trapped inside the veggies seep out into the water. When the cooking is done, where does that water go? Unless you’re using a bit of it for the recipe, the likely answer is “down the drain,” and with it most of what makes the beets taste good. The same can be said for Brussels sprouts. The results are flavors described as “bitter,” “bland,” and generally disgusting. I know there are other reasons people don’t like these two veggies including texture and smell, but cooking them poorly doesn’t help.
There are many great suggestions for roasting, sautéing and otherwise NOT boiling both beets and Brussels sprouts. By far, the best method for beets is roasting, but I will leave those directions for another day. Today I want to focus on the sprouts.
A few years ago a colleague introduced me to sage butter. Sage was an herb I previously shied away from, feeling completely incompetent in its use. But combine it with butter and… heaven. Add sprouts, yeah, awesome.
Sage Butter Brussels Sprouts
- Butter, half stick or more
- Fresh sage leaves, half cup or more
- Brussels sprouts, 2-3 cups
- Sea salt
In a large pan, add a lot of butter (seriously, don’t be stingy, a good half stick or more is appropriate). Using fresh sage, tear up about a half cup up of rinsed leaves, more if you like – they will cook down, so it’s important to at least cover the bottom of the pan once, but I like closer to twice. Turn the heat to low, cover and let alone for 30 minutes minimum, I suggest 45 mins to an hour if you have time. Stir a few times to coat the leaves, otherwise, as long as the butter does not bubble (too hot!), you should be able to set a timer and walk away.
While the butter is doing its thing, rinse your sprouts. You’re going to want enough to cover the bottom of the pan once when they’re cut in half, but up to two layers deep will work. Slice each sprout in half. Remove bad spots and trim ends if brown. As a veggie with several layers, I recommend soaking and/or rinsing them again once cut in half.
The next part is something I experimented with many times, but it seemed hit or miss on getting just the right texture, flavor and color. Last fall, however, I found this recipe for Golden-Crusted Brussel Sprouts. It’s quick and delivers just the right tenderness, maintains the lovely bright green color and adds a touch of mouth-watering caramelization. While the referenced recipe uses oil, we’ll continue with our sage butter.
Once your butter is ready (give it a taste, should be infused with sage-y goodness), dump in the sprouts. Turn the heat up to medium and stir to cover the sprouts with butter. Sprinkle with a shake of sea salt and cover. The moisture on the sprouts (from rinsing) and in the butter will “steam” the veggies. Cook for 5-7 minutes, uncover to stir and taste test. Depending on the size of your sprouts and how many you’re cooking, they may take a few more minutes to be tender. You’re going for something similar to “al dente” in the pasta world, or “just tender” as the other author put it. If they’re not quite ready, put the lid back on and allow to cook for a few more minutes. When ready, remove the cover, add another shake of sea salt, turn heat to high and allow to caramelize. I suggest turning a few times, so you can get browning on both sides, but the main thing is to not let the butter burn (browning is ok). This heat will also cause the sage to get a little crispy – one of the best parts, in my opinion.
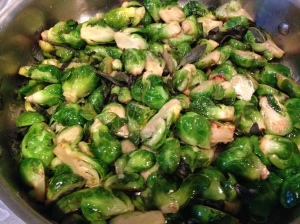
![IMG_0676[1]](https://foodaccordingtoemily.com/wp-content/uploads/2013/10/img_06761.jpg) While I know this recipe won’t convert every person who despises sprouts, I promise it will convince at least some of the “sprout curious” or those open to giving them a second chance after childhood trauma.
While I know this recipe won’t convert every person who despises sprouts, I promise it will convince at least some of the “sprout curious” or those open to giving them a second chance after childhood trauma.
Blue potatoes and candy cane beets: The odyssey of an heirloom
Last weekend I made a big pot of Borscht, as I do at least once every year. I use the recipe from the original Moosewood cookbook, and it’s pretty much my favorite soup ever. They should call it “Root Veggie (plus Cabbage) Delight.”

Blue potatoes and candy cane beets
But my love of Borscht is not why I’m writing this post. This post came to fruition because I used a few new ingredients in the Borscht this year. Nothing wild and crazy, just blue potatoes and candy cane beets. That’s right. BLUE potatoes and CANDY CANE beets. I promise you, I am not making these up.
You see, in our current agricultural system we grow very few of the crops once available and cultivated by humans around the planet. I recently finished reading an article in the July 2011 issue of National Geographic called “Food Ark,” which discussed a number of issues around seed varieties which have been lost and many which have been saved through the hard work of concerned individuals across the globe. Even still, the number of beets varieties commercially available has gone from 288 to 17 in the last one hundred years. Lettuce has gone from 497 varieties to just three dozen in the same period of time. And the case of dwindling options goes on – this chart gives a stark visual of the seed situation.
Many of these types of crops, as well as livestock, which are not seen in large scale farming, are referred to as “heirlooms.” Most were developed by local communities to suit the growing conditions of the area, and were subsequently saved by generation after generation. Because these seeds belong to families and communities, they are hard to patent, thus a very important aspect of heirlooms. Food sovereignty. Most of the world’s seeds are “owned” by a select few companies – something I personally think should be illegal – and these heirloom varieties are an important part of maintaining all people’s right to food.
Some people will try to tell you that heirlooms are “genetically inferior” and “only alive for nostalgia’s sake,” but it simply isn’t true. Sure, not all heirlooms can be grown everywhere, to a certain extent that defeats part of the purpose of heirlooms, but many of them have traits (pest and disease resistance, as well as drought or flood tolerance) which make them much stronger in certain regions than the commercial, monocrop varieties most of us buy at the grocery store. In addition, the taste of many heirlooms is absolutely superb. Heirlooms generally don’t do well over long distance travel, there has been no reason to breed that trait into them, as there has been with most large-scale varieties. But many commercial varieties have gained “shipability” and shelf life at the cost of flavor, something that those of us who appreciate good tasting food, in addition to high quality food, appreciate.
This summer, I was involved with three gardens. Our staff garden at work, the community garden at Cottageville Park and a shared garden with a friend, each of which contained several heirlooms. We tried the Cylindra Beet and Envy Soya Beans (edamame) from Baker Creek Heirloom Seeds. A friend donated squash, okra and lettuce varieties from Seed Savers Exchange. The plethora of tomato seedlings we planted in the three gardens this year were almost all heirlooms; some of my favorites have names like Stump of the World, Pruden’s Purple, Orange Strawberry, Black Cherry, KBX and Paul Robeson (many of which came from my friend at Norsejenta’s Seedlings). Our peppers came in a fantastic array of shapes, sizes and colors; highlights include Bulgarian Carrot and Cayenne, both scorchingly hot, and Lipstick and Gypsy, two sweet treats I’ll be repeating in the future.
All in all, I think this was one of the most diverse and colorful gardens I’ve ever been proud to grow. There are many options for buying both seeds and seedlings. So next spring, as you begin to plan your garden, consider heirlooms, you may just find your new favorites.
Un-beet-able
It’s 9:15 pm and I’ve just now finished eating dinner. I came home later than planned and was then distracted by other things, so by the time I got around to contemplating my options, I needed something fast. Having already eaten a salad for lunch, I steered clear of the lettuce, but beyond that, pickings were slim.
Sliced cheese and tortilla chips got me out of more than one dinner fix this winter, but with all the veggies now available, I felt too guilty to go that route. There is plenty of pasta in the cupboard, but with no pesto or sage butter, that didn’t sound appealing. And roasted beets, while amazing (and a favorite), are too time consuming for as late as I was starting.
Which is how I arrive at beet greens. Unlike the beetroot, the greens cook up very quickly. Though largely viewed as inedible and quickly destined for the compost bin in most households, being creative with beet greens is not only healthy for you, but also helps cut down on our food waste! Tender much like spinach and swiss chard, these nutrient packed beauties are ready and waiting for your next menu.
I’ve done beet greens a few different ways in the past; usually it involves oil, garlic and some method of steaming or blanching the leaves. Wanting something a bit different this time, I turned to my trusty search engine and in the first page of results, came upon this lovely Beet Greens Salad recipe. While it still involved the aforementioned ingredients, this recipe has a few twists to what I’ve done before.
To make this salad, you will need:

Beet Green Salad
- Greens from 2 bunches of beets
- Salt and pepper, to taste
- 3 Tbsp olive oil
- 1 clove garlic, finely chopped
- 2 Tbsp lemon juice
- 1/4 red onion, very thinly sliced
- 1 ripe tomato, coarsely chopped
- 1/4 c slivered almonds, toasted until golden
1. Rinse the greens thoroughly in several changes of water.
2. Bring a large pot of salted water to a boil. Add the greens. Blanch 1 minute. Drain and rinse with cold water. With your hands, squeeze out the excess liquid. Chop the greens coarsely.
3. In a large skillet, heat 2 tablespoons of the olive oil. When it is hot, add the greens, garlic, salt, and pepper. Cook, stirring constantly, for 2 minutes or until the greens are tender but still bright colored.
4. Transfer the greens to a bowl.
5. In a small bowl, whisk the lemon juice, salt, pepper, and remaining 1 tablespoon olive oil. Pour the mixture over the greens and toss well. Add the onion, tomato, and almonds. Toss again. Taste for seasoning and add more salt and pepper if you like. Adapted from Justin Melnick, executive chef of Tomasso Trattoria
MY NOTES: First, a comment on oil. Whenever a recipe calls for cooking with olive oil, I always substitute an oil with a higher smoke point, which is the temperature at which the oil begins to break down. Olive oil to breaks down around 200-250º and at that point can actually become toxic. Options like canola, safflower or sunflower oil are much better for any medium or high heat pan cooking. So, for this recipe, I used canola oil for sauteing the greens, but olive oil for the dressing.
The taste on this salad was absolutely phenomenal. The lemon really helps bring out more of the flavor of the greens, and the onions and tomatoes add some nice texture and taste contrast. I didn’t have any almonds, so I toasted up a handful of raw sunflower seeds, which worked well, though I’d love to try this again with almonds.
So, next time you get a bunch of beets at the farmers market, before you put them in the fridge, twist off the stems/leaves and put them in a separate bag. The roots will last for a long time, but don’t wait more than a few days for the best quality of the greens.
Enjoy!
