Food wasted, never tasted
I want to share a commentary, a bit of “food for thought” if you will, I recently wrote after reading an article on Minnesota Public Radio regarding the massive amount of food waste in the United States.
The USDA did the math and figured out that all the food we trash in the US is equivalent to 141 trillion calories, or 1,249 calories per capita per day.
That’s interesting, but lets put this in even more perspective. I did a little more math using the recommended daily caloric intake of 2,000 calories for the average person. All that food we throw? It’s enough calories to feed approximately 193 million people, EVERY DAY OF THE YEAR.
The USDA also estimates that in 2012, 14.5% of households were “food insecure.” The USDA defines food-insecure as households that had “difficulty at some time during the year providing enough food for all their members due to a lack of resources.” If you figure that the average household is 2.6 people, that is approximately 116 million Americans who at some point (probably more than once) in the year did not know how they would get enough to eat.
So, here it is, plain and simple. We’ve got 116 million people who go hungry for lack of resources at some point in the year. We are trashing enough food to feed 193 million a day. Now, you do the math.
Sage butter makes the Brussels better
Very often when I tell people that two of my favorite vegetables are beets and Brussels sprouts I get a look as if I just grew a second nose. “You can’t be serious” and “REALLY??!” are some of the most comment responses, along with “I can’t stand _____, I used to have to eat them as a kid, and….yuck!”
Sadly, I find that frequently both of these vegetables end up with an “F” grade because they aren’t cooked well AT ALL. Think of the last time you (or someone you know) cooked beets or Brussels sprouts. How many of you boiled a pot of water as the first step? If the second step was putting either of these veggies into that water, I can tell you already, you went wrong from the beginning.
You see, water is amazing. It gives us life, grows our food, washes away dirt and germs, however it can also steal away valuable and irreplaceable nutrients and flavor in cooking. With beets, this is easy to see. Almost immediately the water turns brilliant pink when beets are added. As you heat and boil these roots, the nutrients and flavors (especially the sweetness) trapped inside the veggies seep out into the water. When the cooking is done, where does that water go? Unless you’re using a bit of it for the recipe, the likely answer is “down the drain,” and with it most of what makes the beets taste good. The same can be said for Brussels sprouts. The results are flavors described as “bitter,” “bland,” and generally disgusting. I know there are other reasons people don’t like these two veggies including texture and smell, but cooking them poorly doesn’t help.
There are many great suggestions for roasting, sautéing and otherwise NOT boiling both beets and Brussels sprouts. By far, the best method for beets is roasting, but I will leave those directions for another day. Today I want to focus on the sprouts.
A few years ago a colleague introduced me to sage butter. Sage was an herb I previously shied away from, feeling completely incompetent in its use. But combine it with butter and… heaven. Add sprouts, yeah, awesome.
Sage Butter Brussels Sprouts
- Butter, half stick or more
- Fresh sage leaves, half cup or more
- Brussels sprouts, 2-3 cups
- Sea salt
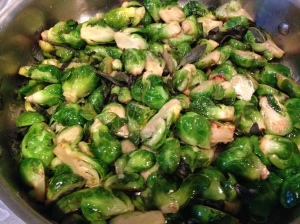
In a large pan, add a lot of butter (seriously, don’t be stingy, a good half stick or more is appropriate). Using fresh sage, tear up about a half cup up of rinsed leaves, more if you like – they will cook down, so it’s important to at least cover the bottom of the pan once, but I like closer to twice. Turn the heat to low, cover and let alone for 30 minutes minimum, I suggest 45 mins to an hour if you have time. Stir a few times to coat the leaves, otherwise, as long as the butter does not bubble (too hot!), you should be able to set a timer and walk away.
While the butter is doing its thing, rinse your sprouts. You’re going to want enough to cover the bottom of the pan once when they’re cut in half, but up to two layers deep will work. Slice each sprout in half. Remove bad spots and trim ends if brown. As a veggie with several layers, I recommend soaking and/or rinsing them again once cut in half.
The next part is something I experimented with many times, but it seemed hit or miss on getting just the right texture, flavor and color. Last fall, however, I found this recipe for Golden-Crusted Brussel Sprouts. It’s quick and delivers just the right tenderness, maintains the lovely bright green color and adds a touch of mouth-watering caramelization. While the referenced recipe uses oil, we’ll continue with our sage butter.
Once your butter is ready (give it a taste, should be infused with sage-y goodness), dump in the sprouts. Turn the heat up to medium and stir to cover the sprouts with butter. Sprinkle with a shake of sea salt and cover. The moisture on the sprouts (from rinsing) and in the butter will “steam” the veggies. Cook for 5-7 minutes, uncover to stir and taste test. Depending on the size of your sprouts and how many you’re cooking, they may take a few more minutes to be tender. You’re going for something similar to “al dente” in the pasta world, or “just tender” as the other author put it. If they’re not quite ready, put the lid back on and allow to cook for a few more minutes. When ready, remove the cover, add another shake of sea salt, turn heat to high and allow to caramelize. I suggest turning a few times, so you can get browning on both sides, but the main thing is to not let the butter burn (browning is ok). This heat will also cause the sage to get a little crispy – one of the best parts, in my opinion.
![IMG_0676[1]](https://foodaccordingtoemily.com/wp-content/uploads/2013/10/img_06761.jpg) While I know this recipe won’t convert every person who despises sprouts, I promise it will convince at least some of the “sprout curious” or those open to giving them a second chance after childhood trauma.
While I know this recipe won’t convert every person who despises sprouts, I promise it will convince at least some of the “sprout curious” or those open to giving them a second chance after childhood trauma.
Bebop-a-rebop rhubarb… jam
Though the calendar says June 10, most people in Minnesota would tell you that it feels like early April. Personally, having spent my college years in the state of Washington, I’ve been describing this month as “late February in the Pacific Northwest.” Cold and wet. A drizzle to be exact. Generally miserable for gardeners and lovers of the sun alike.
That said, there is one staple of the early spring that is excelling in this cool weather. The ever popular rhubarb. Though technically a vegetable (we’re using the stalk, not the “fruit” of the plant), most eaters think of rhubarb more as a fruit, as it is often found in sweet desserts like pies. I grew up with a mom who regularly made rhubarb crisp, sprinkled with oatmeal and sugar crumbles and of course, a packet of strawberry or raspberry Jell-O, so I would generally be in agreement with the “fruit” designation (though the biologist side of me balks at this misclassification).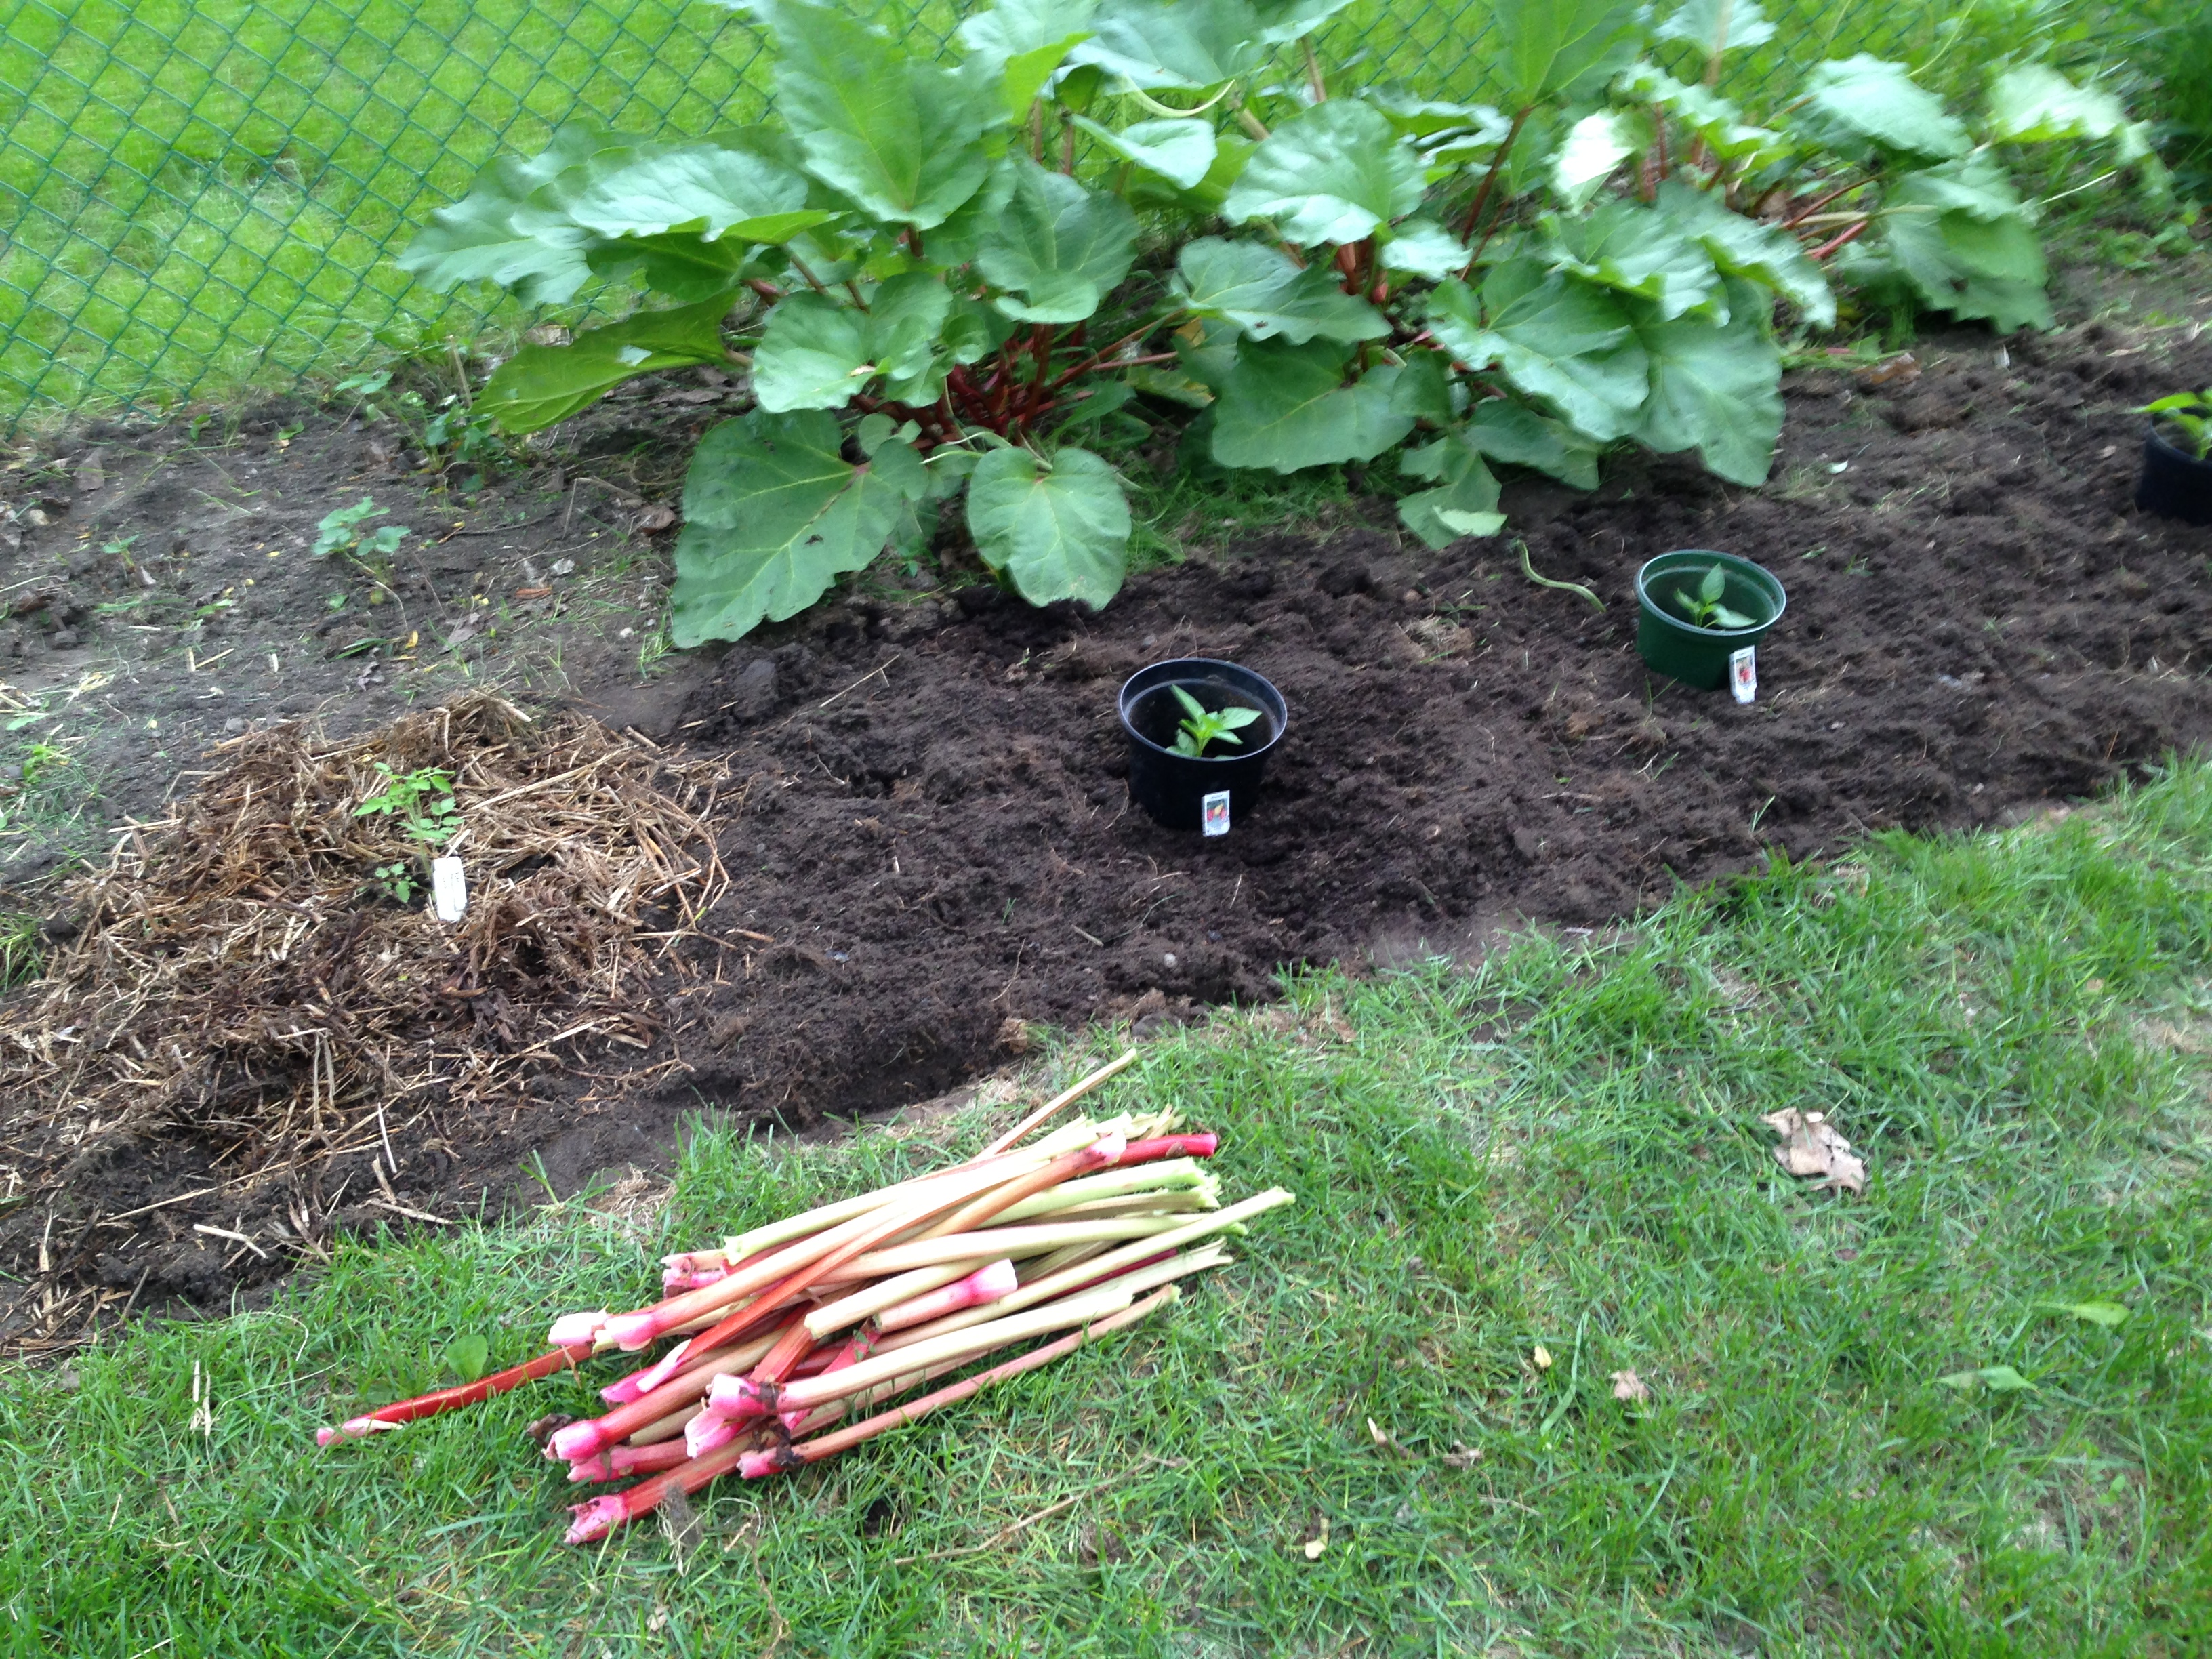
The simplest way to eat rhubarb, yet the most difficult for some, is straight out of the garden. I have vivid memories of my brother and I eating stalks of rhubarb, dipped in a small plastic cup of sugar, the stringy skin always a challenge, but the tart and sour treat worth the effort. This method is not for everyone, particularly those who don’t love the “pucker in the far back of your jaw” feeling.
That said, a bit more sugar and maybe a few other ingredients and you’ve got yourself a much more palatable sweet and sour combo. As previously mentioned, this often manifests itself as dessert, but another incredibly easy option is jam.
Having gotten what I consider incredibly lucky, I discovered this spring that the house we bought this winter had a garden already planted with not one, not two, not three, but FOUR rhubarb plants, all of which, given the cold weather previously mentioned, have done very well so far this year. Not wanting to waste this early season bounty, last night I set to the task of preparing a bunch for freezer jam. For those of you leery of canning, I highly recommend freezer jam as an easy, and more or less “fail safe,” way to get into home preserving. With rhubarb, you don’t even need pectin, just a knife, a pot and a bunch of sugar. The recipe I followed was one my mom found online and you can find it here.
MY NOTES: The recipe calls for six pounds of rhubarb. If you’re like me, I don’t have a scale to measure that small of an amount, so I used the rough conversation suggested by the original blog author of one pound equaling about four cups of rhubarb. Knowing I didn’t have enough for 24 cups (six pounds x four cups), I opted to cut the recipe in half. After I measured my 12 cups, I started adding sugar. Five cups of sugar seemed like it would be an awful lot, being someone who prefers the sour to the sweet in a rhubarb jam, so after three cups, I stopped, seeing the chunks were thoroughly coated and a nice juice was forming. If you have a bigger sweet tooth, you may prefer more. If you use less as I did, you might have to cook it a bit longer to help with gelling, but really, since it is freezer jam, it doesn’t matter as much as canned jam.
Once you have cooked the jam, you have a couple options. Some people will recommend you let it completely cool in the pot before you fill your jars. Personally, I put it in jars and let it cool on the counter for a while, then put it in the fridge overnight to cool completely. Either way, there are two things you should NOT do and they are: do not put hot jam in the fridge (this warms other items in the fridge and isn’t good for food safety or fridge efficiency) and do not put hot or warm jam in the freezer (mainly because this big change in temp can cause your jars to break, and like the fridge, it isn’t good to warm up the freezer).
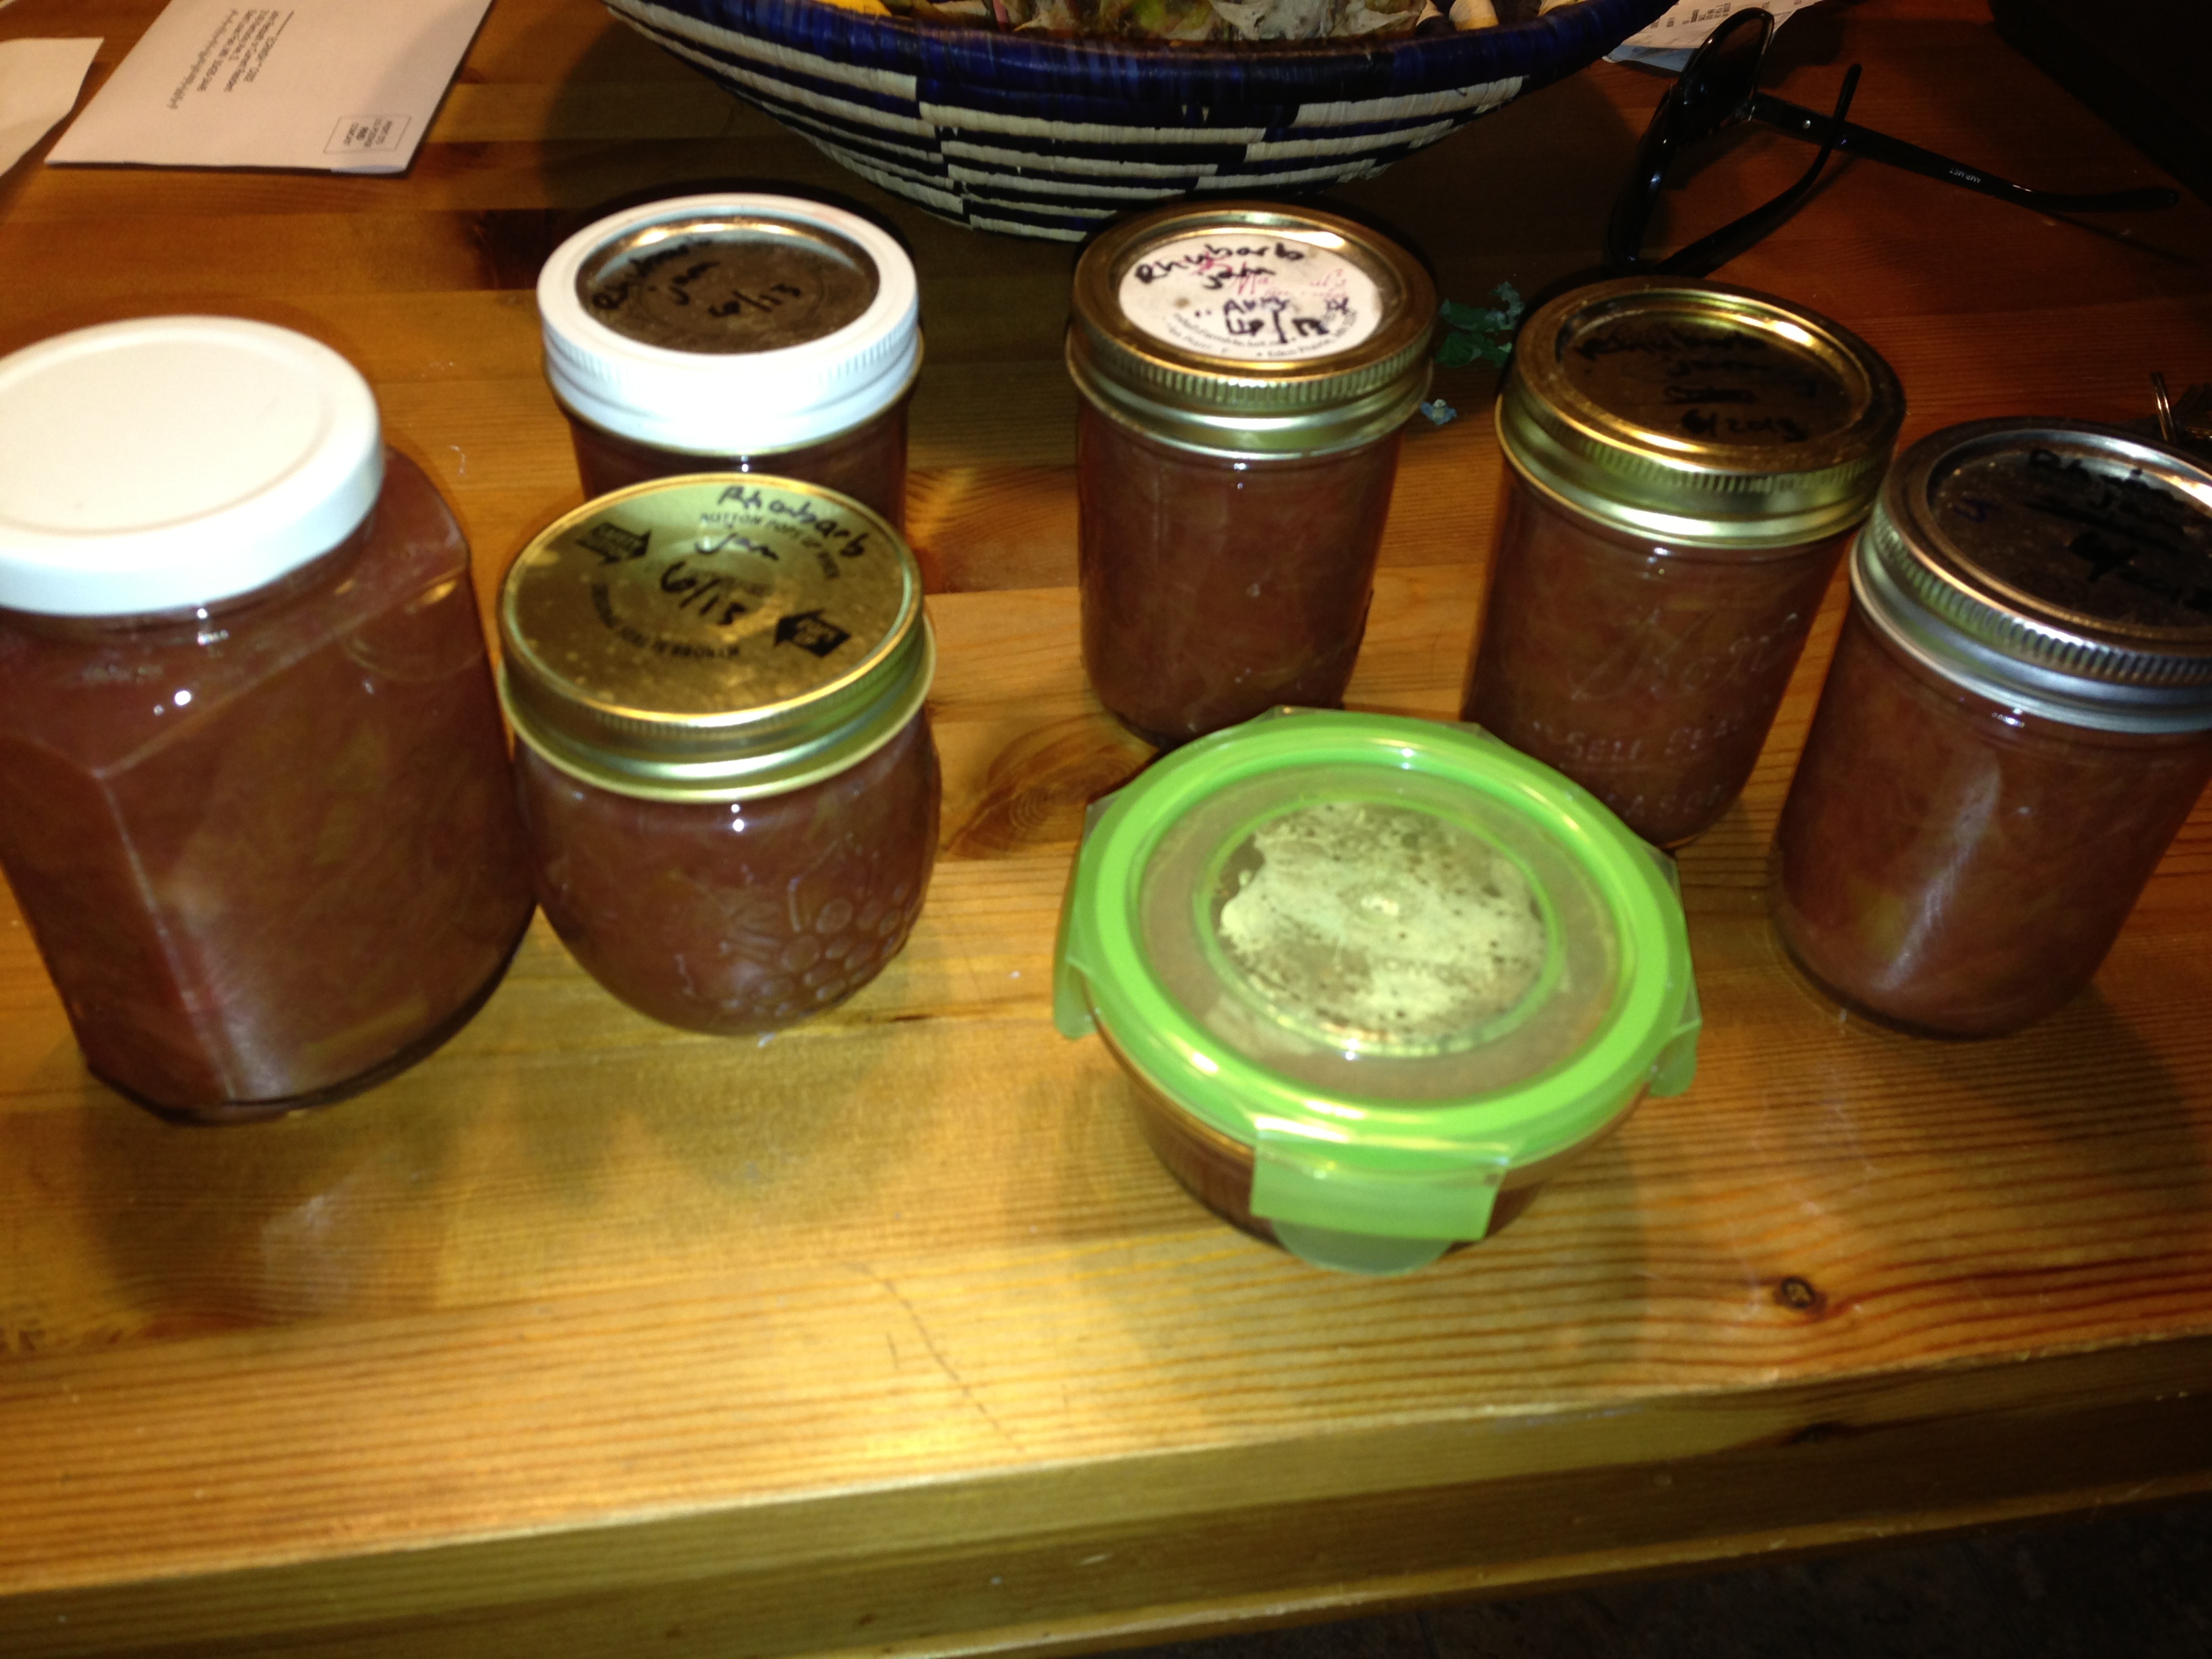
Another nice thing about freezer jam is you don’t need official canning jars, you can really use anything you want, though I personally recommend limiting the use of plastic and only freezing in glass, such as old jam or condiment jars. I also recommend going with smaller jars (half pint or less), unless your household goes through a lot of jam quickly. Mine does not, so the smaller jars are better for making sure they don’t go bad in the fridge once thawed.
As expected, this jam was right the right balance of sweet and tart for me. It was perfect on a slice of toast and I can only imagine it will be divine on chocolate or vanilla ice cream.
Crooning over macaroons
This might be a culinary sin to admit, but I don’t really like chocolate chip cookies. I mean, sure, if offered one I’d likely eat it, but given options, I’d almost never pick one off a dessert tray, nor would I ever shell out my own money to buy one. For example, while many Minnesotans line up in droves to buy buckets of Sweet Martha’s Cookies at the State Fair every summer, I quickly skirt by on my way to the corn on the cob. For some reason, the chocolate chip cookie is just too sweet for me, sometimes sickeningly so. It’s not that I don’t like chocolate, I LOVE chocolate (at least the dark stuff), but over and over, I’ve found these cookies to simply be too much for my taste buds. That said, if the cookie were oatmeal chocolate chip, especially like the ones from Tank Goodness, or included raisins, I’d definitely be more inclined to give it a go. Not sure why the oatmeal and raisins change things (no, it has nothing to do with thinking it might be healthier, I’m not delusional), but it does.
All that to say that there is another cookie which I would eat every time, and then probably two or three, given the chance. And that, my friends, is the coconut macaroon.
Now, I realize I might sound a bit strange, not liking chocolate chip, but swooning over macaroons and all, but seriously, though I know they’re far from societies go-to cookie, I don’t think I’ve met one I didn’t like. The crunchy caramelized outer “crust” with the soft, chewy inside. Slightly sweet, yet rarely does the sweetness dominate. The unique, slightly buttery flavor of the coconut. It all comes together in one perfect treat.
Given my love of macaroons, I’ve been itching to try making a batch for some time. I had some coconut from another recipe and figured it would be a good way to use it up, so I began the recipe search. I quickly found that, while the ingredients are relatively universal, their proportions and methods for mixing are not. One recipe called for whisking the egg whites and sugar in a bowl placed over a pot of boiling water, mixing in the other ingredients and then letting it chill for two hours – I decided that one was better left for another time when I had all afternoon. Some recipes called for coconut flakes, while others recommend shredded – I actually had grated, which is quite different, but I decided to try it anyway. All have a sweetener, but are about split down the middle as to whether that is sugar or sweetened condensed milk. Some are dipped in chocolate or drizzled in caramel, while others mix in nuts or dried fruit. There seem to be endless possibilities. In the end, I found a recipe that created a smaller batch of plain macaroons, which I figured was a good place to start as my first try.
MY NOTES: With the ingredient proportions from that recipe, I used a few of the techniques I’d seen on others, including whisking the 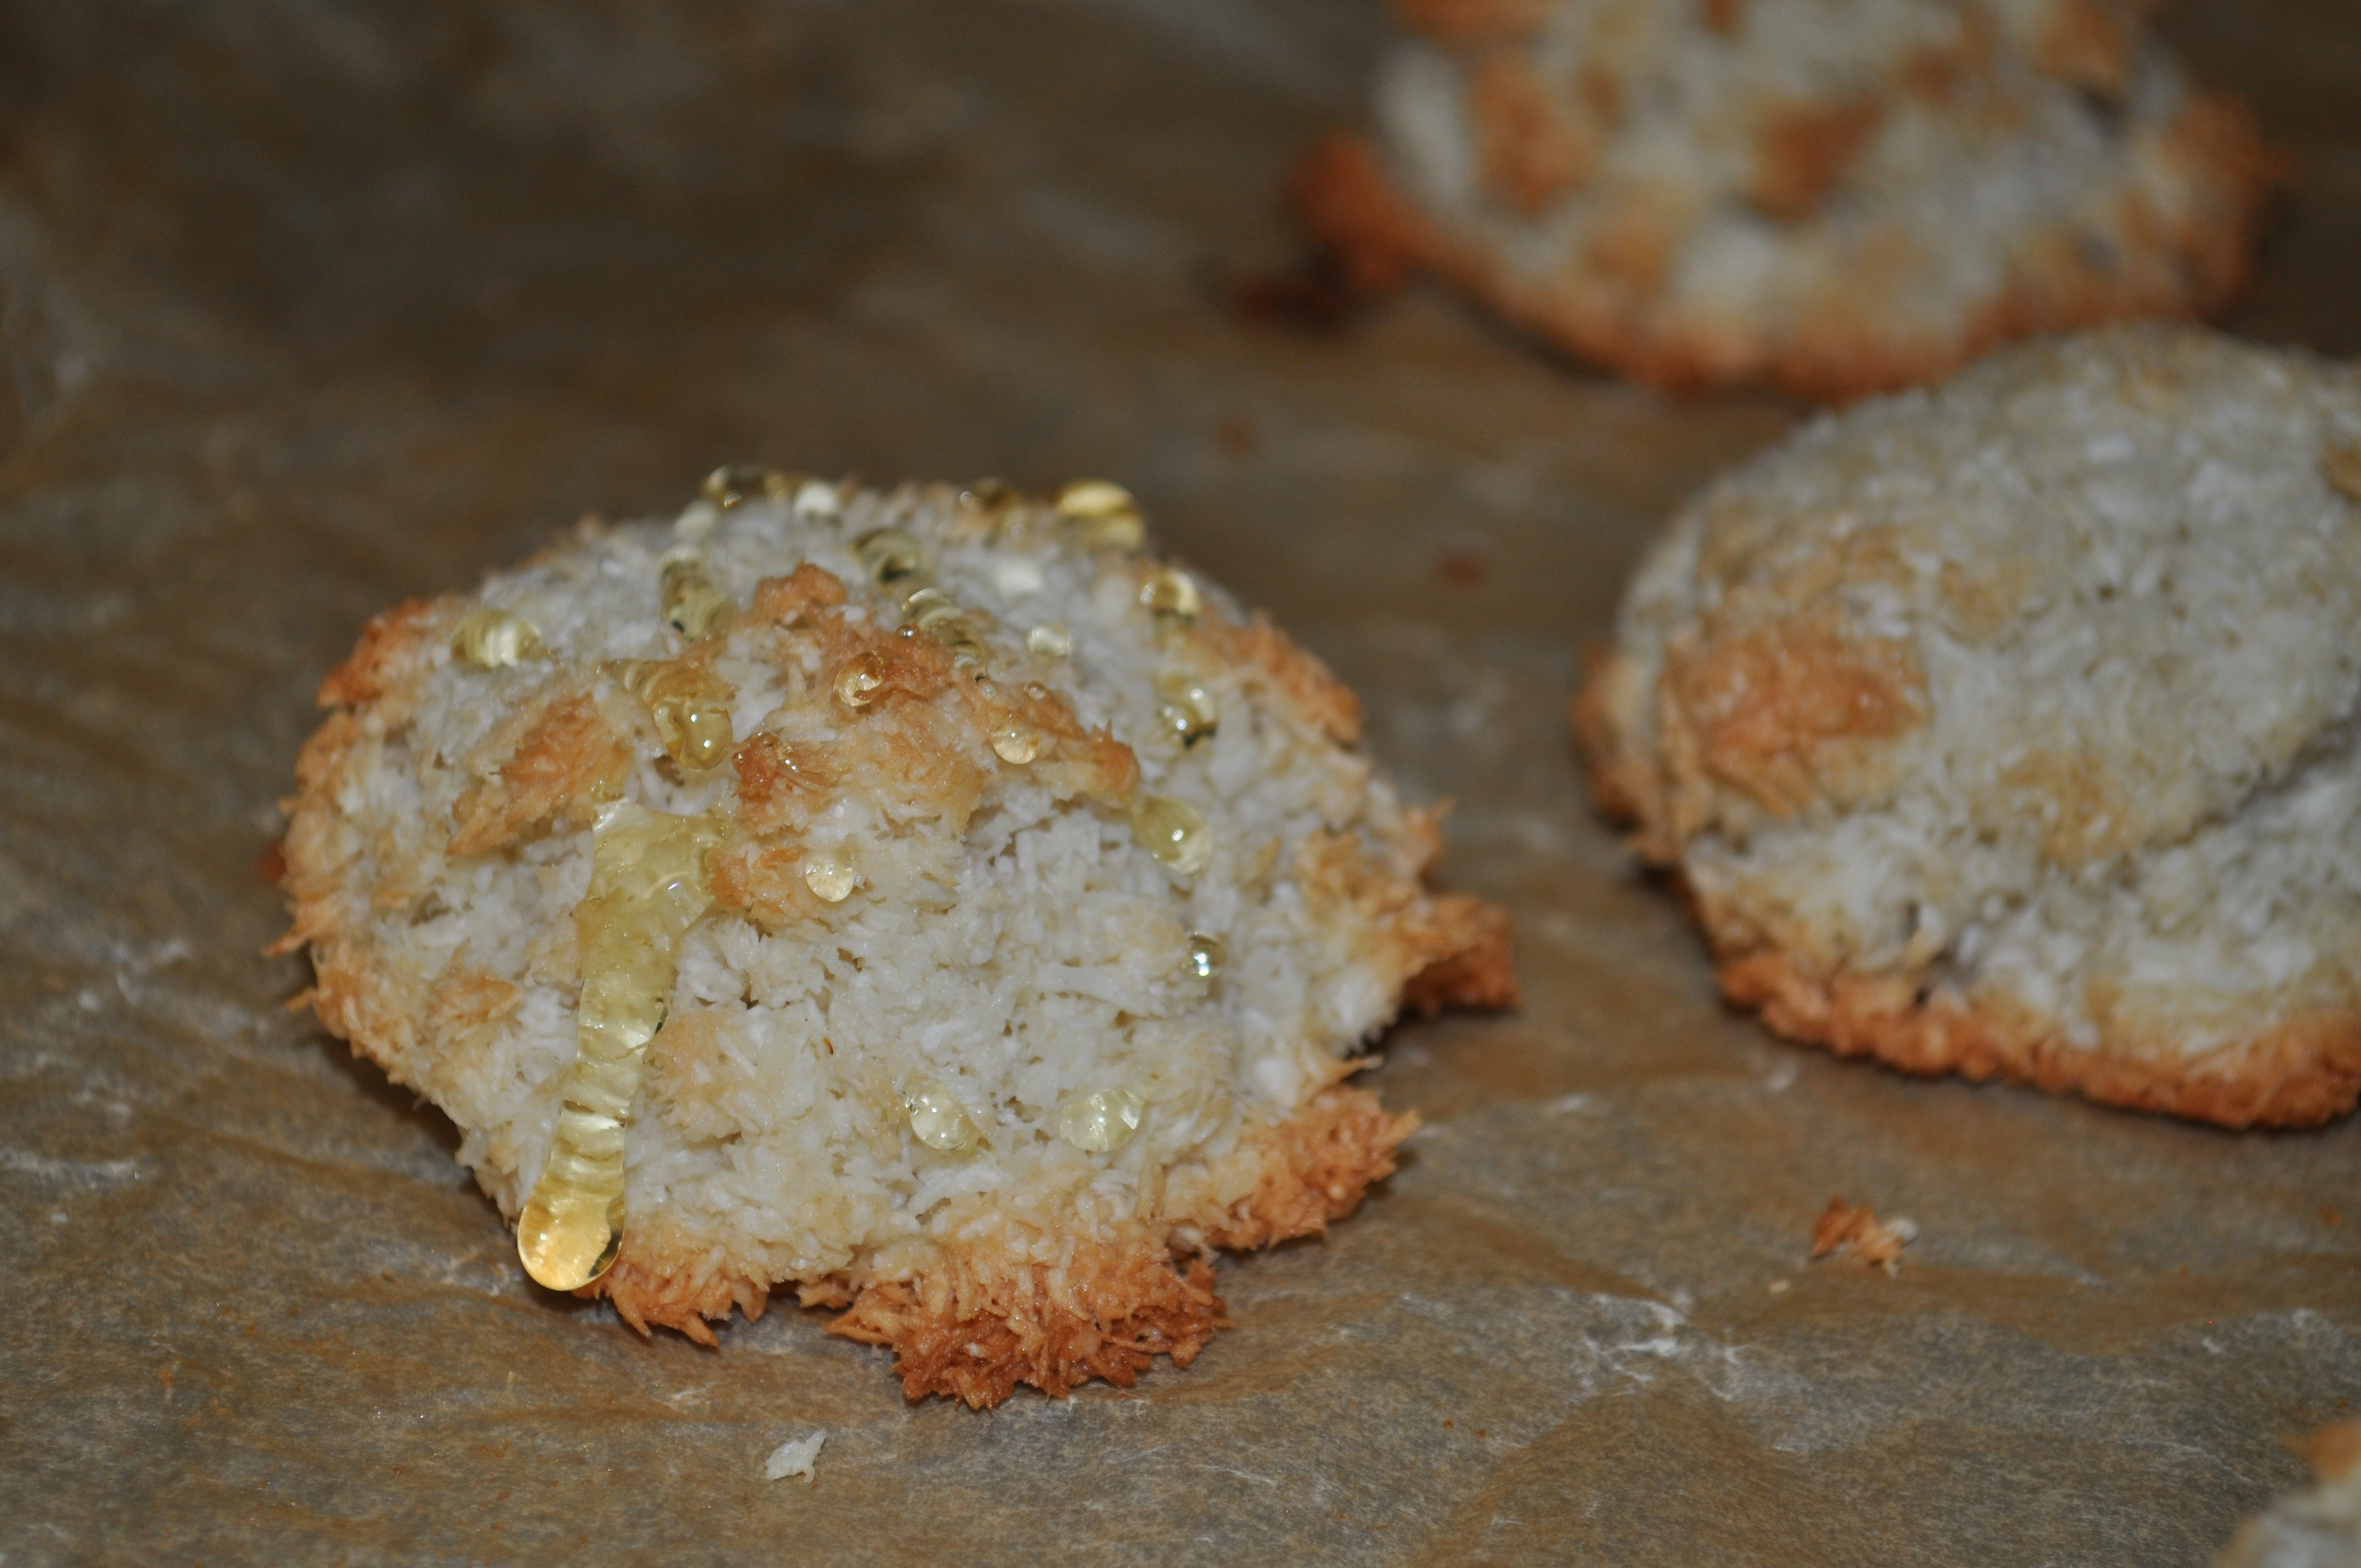 egg whites and sugar together (but not over the boiling water) until they were a bit fluffy, as well as folding in the coconut last. I ended up baking mine about 16 minutes at 325º F. What came out of the oven looked a lot like many macaroons I’ve eaten, though the texture was definitely different given the grated coconut. The outside crust was nice and crunchy, though the overall cookie a bit drier than I hoped. Also, it was slightly less sweet than I expected. Upon inspection of the coconut package, I realized that the kind I had was unsweetened and also lower fat – why on Earth I had this stuff, I don’t know – two things I have since read you should not use for macaroons. The lack of fat likely explains the dryness as well. I did drizzle one with a bit of local honey and that added a hint of sweetness, as well as moisture, bringing it closer to the cookie I love.
Overall, I like how simple of a cookie macaroons are to make and am satisfied I’ve finally ventured into baking them. Next time though, I’ll get myself some fresh, sweetened and full fat coconut shreds.
“Anything goes,” so they say.
If you’re like me, you get a lot of emails, many of them not personal. Most of them I bring upon myself as a consequence of my apparent inability to resist the “Subscribe here” urge. I’ve clicked those buttons, or signed up at events, often enough that I created a secondary email address for all of these emails to go to. In turn, this means that just a few actually get read. This is kind of sad, I’ll admit, having written enewsletters myself, because I know the time that goes into them at the other end, with all the concern about format or images or color schemes. That said, the reality is, what I open each month has little to do with any of that. In all honestly, the likelihood that any one of these emails will be read by me is kind of like a game of roulette – one month Organization X gets lucky, the next it might be Retail Store Y.
A few days ago, my random email read of choice was from a store in Minneapolis called Local D’Lish. Opened a few years ago in downtown, the owners state on their About Us page that “Every purchase from Local D’Lish is helping to support our own local farmers and small businesses.” For those of you who know me, you can guess that this strikes a chord with my commitment to buying local food and supporting the businesses that, in my opinion, are most valuable to our communities. Due to the location, however, I’ve only made it into the store once, about a year and a half ago, but from what I remember, they’ve done an excellent job of connecting with local growers and food creators, mostly small and medium-sized operations, to stock the shelves of the small store with all sorts of culinary delights.
What I discovered in the Local D’Lish enewsletter last week is that each month they feature a recipe (something I guess I either forgot or didn’t know, given the infrequency with which I have read the emails). The quasi-recipe this month was called “Anything Goes Soup.” This one specifically caught my eye because I’ve been working to clean out my freezer and cupboards in anticipation of the coming growing season (yes, I know, I know, we are still several months out from harvest time – a girl can dream, right?). I also had a goal this last year of using everything from 2012 before the 2013 season (or at least by the end of the 2013 summer), and I found that somehow I was still using things from 2011 (I am guessing this is not a phenomenon specific to myself), so I’ve had some extra motivation this winter. As part of this effort, a few weeks ago I made a chicken chili and was quite proud of myself for only using ingredients I already had – it really does speak volumes to the idea of “shopping at home” first before making your next meal, both as a way to save money and waste less food.
As you might guess, a recipe called “Anything Goes Soup” is really more of a guide than a specific set of directions, which made the recipe even more appealing because I’ve been trying to feel a bit more brave with experimenting in cooking versus just doing what other people have already done. Nothing wrong with following a recipe, but there is much to be said for being able to create your own kitchen masterpieces sans a cookbook.
So, here’s the recipe as presented by Local D’Lish:
Ingredients:
- a can of stewed tomatoes (from your mom’s garden or wherever…)
- a bag of frozen corn (that you blanched last August and dutifully froze and forgot about)
-
an old yogurt container full of turkey stock from Thanksgiving (or beef stock from Christmas, or chicken stock from who-knows-when)
- any and all of the wilty celery and slightly wrinkly potatoes that have fallen to the back of your crisper
-
a can of pinto beans that’s been sitting under your kidney beans long enough
- the tail end of 3 different kinds of pasta, not enough on their own, but who cares if you have rotini, macaroni, and rigatoni in your soup?
- pretty much anything else that needs to get used up (can of tiny shrimp from that cheese dip you never made, ham hock from your meat CSA, garlic that started to sprout little green tails…). You get the idea.
-
SALT.
- Ground black pepper
-
any seasoning you like, but hearty dried herbs like oregano, thyme, and rosemary are great with most thrown-together soups
Directions:
- Thaw your stock either by putting it in the fridge the day before. OR put it in a warm water bath for an hour or two.
- Cook any savory bits (like onions, garlic, ginger…) in a sauce pan with a bit of oil until tender.
- Add stock and any juicy stuff (like canned tomatoes).
- Add raw/frozen vegetables and cook for a while.
- Add any meat.
- Save already cooked veggies (like beans) and pasta until the end so you don’t overcook them into mush. Unless you like mush. Which can also be tasty.
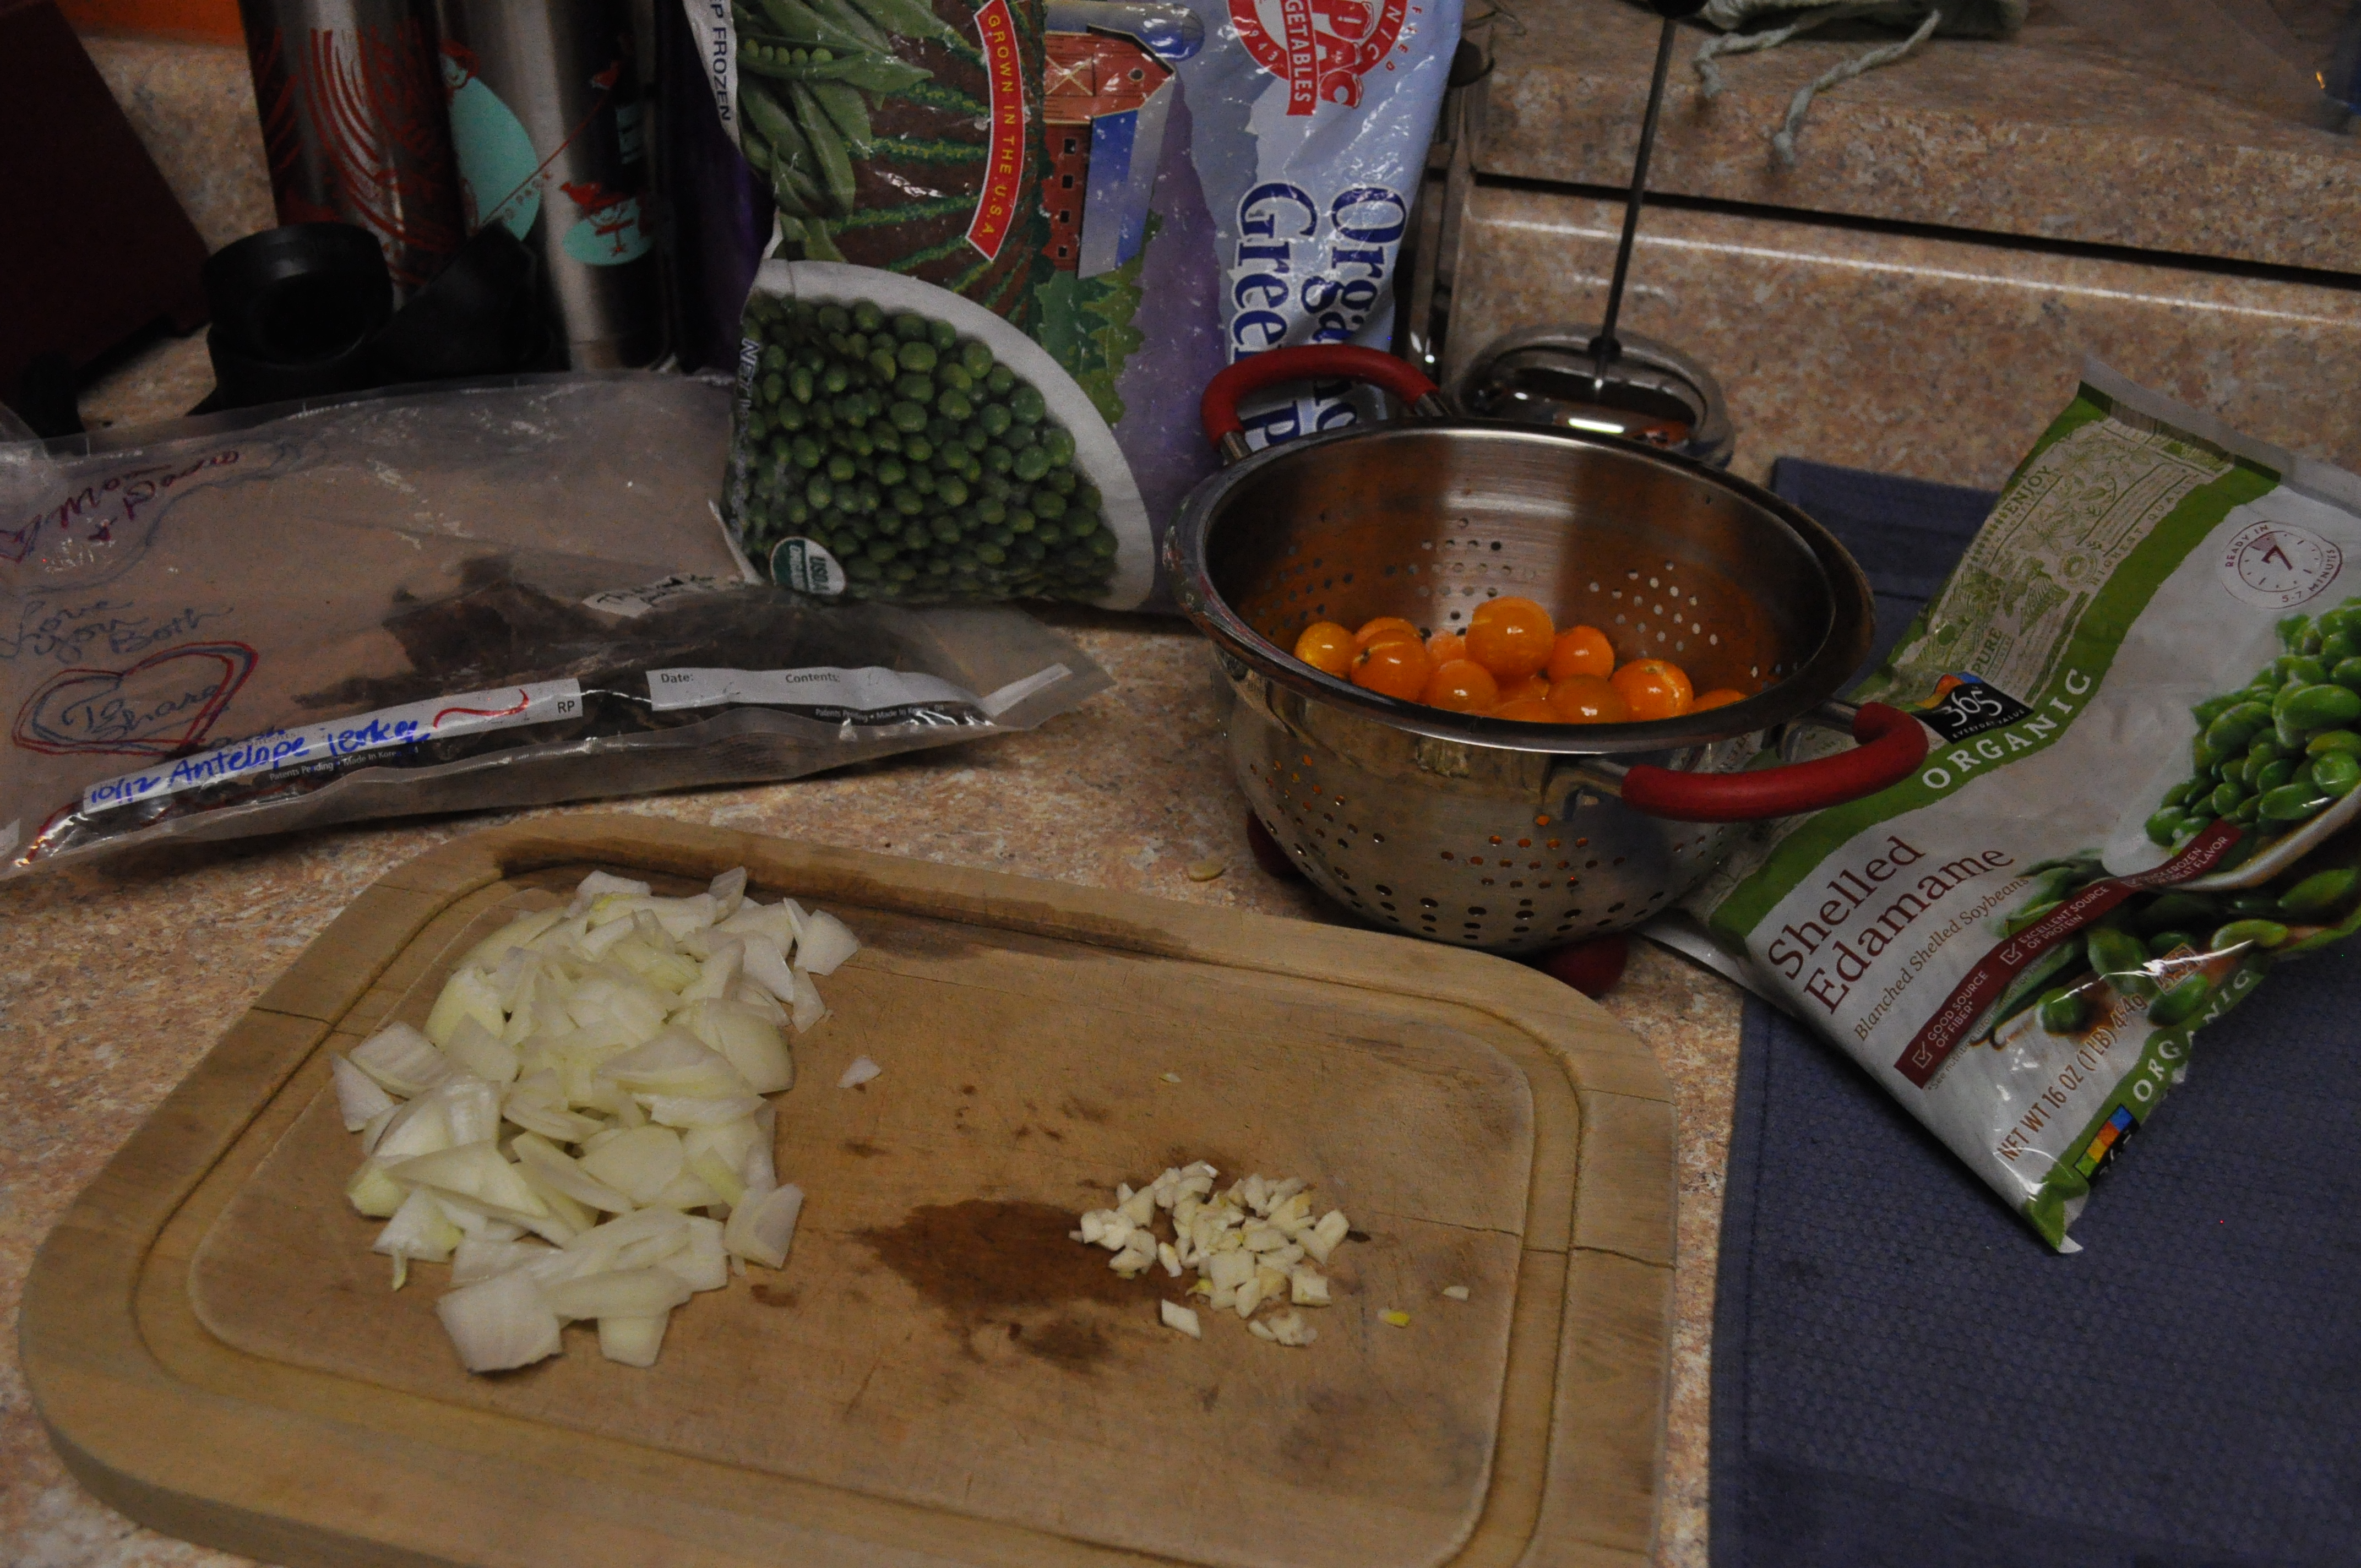
Knowing I had plenty of “anything” in the list above, I assessed my freezer, fridge crisper drawers and spice shelf, and assembled the following:
- onion and garlic, both stored from last fall

A few of the ingredients used
- quart of homemade veggie broth, frozen in late 2011
- about one cup of homemade chicken broth, frozen in late 2012
- gallon bag (about 1/3 full) of homegrown Sungold tomatoes, frozen in 2011
- half dozen medium, and very wrinkly, blue potatoes
- two carrots from our fall CSA
- a few pieces of antelope jerky, made by my parents last fall, that had somehow gotten a bit too salty for straight eating
- a few handfuls of store-bought SnoPac frozen peas
- part of a very sad-looking green cabbage
- store-bought bag (about 1/4 full) of shelled organic edamame
- half dozen mushrooms
- two handfuls of penne pasta
- herbs/spices (all dry): parsley (homegrown), thyme (from our CSA last fall), rosemary, Trader Joe’s Salt Free Pasta Blend seasoning, garlic salt, black pepper
- small shake of cornstarch to thicken
Following the order of ingredient addition above, the whole process took me about an hour (including gleaning everything from the various nooks and crannies of my freezer and cupboards) – not bad for a soup.
 MY NOTES: What a great soup! I am very happy with the way mine turned out. It has a rich savory flavor, but also a hint of sweetness which I think is probably from the Sungolds and maybe the peas. Though I didn’t use much meat (just the cut up bits of jerky) or pasta, both add some nice variety to the veggie medley. Had I thought more about it, I probably should have added the jerky about ten minutes earlier so it could hydrate more, but I’m hoping overnight in the fridge will do the same. The color of the blue potatoes is a bit odd with everything else, but I’m glad I opted to use them. I also decided to add the cornstarch to give it a little more of a stew feel.
Soup really is a great way to use veggies that are still edible but are maybe a bit soft, have bad spots which can be cut off or are a little frosty from too long of a stay in the freezer. So, for those of you out there who are constantly digging through bags and containers of frozen or otherwise preserved and stored foods, now is the time to bring them all out and see what you can create. And don’t worry – as they say, “Anything goes!”
Ready, set, roll! Lefse time!
With one month until Thanksgiving and two until Christmas, my brain has started thinking about holiday cooking. Ok, lets be honest, it is always thinking about cooking and baking, but now I think of seasonal things I only plan to make in the coming months. One of my favorites is krumkake, a cone shaped cookie my mom taught me to make and about which I have written before.  Another favorite is lefse, a type of Norwegian flatbread. Last Christmas, my husband and I made lefse with his family, and between the six of us we rolled out 200 rounds! (My husband chided me for not writing a blog about lefse after this feat, so all I can say is, better late than never.)
This past weekend I had a chance to take a lefse making class at Ingebretsen’s in Minneapolis. As I mentioned, this is a food I’m familiar with, so I wasn’t going as a beginner, but I know when it comes to cooking and baking it never hurts to learn from others. You might pick up a trick or learn a technique you never knew before, like this video I recently watched on how to efficiently chop onions. Maybe you all know this method, but I sure never learned it. Why on earth did no one in my junior high Home Ec class teach me this?!
Anyway, before I tell you about the class, I want to make sure you know about Ingebretsen’s.
If you’re not Scandinavian or from Minnesota, this shop’s name may not be familiar to you, but if you are, you know the treasures it holds. First opened as the Model Meat Market in 1921, Ingebretsen’s is a wonderful place full of all things Nordic. Whether you’re looking for a wooden Dala Horse, a troll ornament for your Christmas tree, a cookbook on how to make Danish open-faced sandwiches or a the proper slicer for your gjetost (brown goat cheese), they’ve got it all. If you’re the crafty type, head over to the Needlework side of the store where you’ll find no shortage of threads, patterns and other supplies. And of course, the meat market is still there, full to the brim with fish, cheeses and their secret Swedish meatball mix. In 2011, they celebrated their 90th anniversary with a number of events and the release of their book Ingebretsen’s Saga – A Family, A Store, A Legacy in Food. The book features a history of the Ingebretsen family, the store and Scandinavians in Minnesota, plus over 60 recipes for traditional Scandinavian foods, as well as modern twists on old favorites. I loved the picture of the Tomte Sandwiches, cute little appetizers that look like the Swedish beings known as tomte (in Norway they’re called nisse), and think the Nordic Salmon Chowder sounds divine and perfect for a cold winter evening.
Ingebretsen’s doesn’t only feature items for purchase, but also a number of events and classes, so you can learn the traditions of Norway, Sweden, Denmark, Finland and Iceland. Whether you have ancestors from the Nordic region or just an interest in Scandinavian culture, Ingebretsen’s has a wide variety of craft, needlework, culture and cooking classes. Some of those cooking classes include kransekake (a cake made out of stacked rings of almond flavored dough, frequently seen at Norwegian and Danish weddings), krumkake (I actually teach the class!) and of course, lefse.
Which brings me back to the class I took last weekend. The class was taught by Cheryl Netka, who usually teaches the class with her friend Pamela Strauss (who wasn’t able to be there that day). As a side note, Cheryl’s mother also teaches the kransekake class at Ingebretsen’s. You can watch a fun preview of their classes here:
Cheryl shared with us several tidbits about the history of lefse, a variety of recipes and helpful hints to remember when making your own. One interesting things I didn’t know is that lefse wasn’t always made with potatoes. The potato didn’t come to Norway until the 1700’s, so before that it was just flour. It stored very well and was more like a cracker, which kept well during winter months or on ships. When the potato arrived, the Norwegians began mixing it in the dough and it became more of a delicacy, as we know it today. A practical tip that a seasoned lefse roller likely knows, but was a good reminder for me, is to always roll from the center of the dough out. This gives you nice roundish pieces that are more easily transferred to the lefse griddle.
If you’ve never made lefse or want a refresher, I would definitely recommend checking out the class at Ingebretsen’s. It’s a hands on experience, so don’t forget your apron! And if you would like to invest in your own griddle or need a rolling pin, lefse stick or board, they’ve got that too!
Moroccan Vegetable Couscous
The end of the season is here. Sad to say, but after a beautiful 75º day Wednesday, I’ve conceded that fall is here and by the time Saturday night arrives, we’ll have a hard frost. Sigh.
That said, we’ve had an amazing growing season and I feel abundantly blessed to be harvesting tomatoes the first week of October. Lots of tomatoes. Which brings me to last night’s dinner: Moroccan Vegetable Couscous. I found this recipe through our local co-op publication called Mix, which is always a good source of tasty seasonal dishes.
As I mentioned, I’ve got a lot of tomatoes. And given how many are on my counter starting to soften and get beyond the point where they are very usable in raw form, I’m on the lookout for new recipes that require cooked or canned tomatoes. Though I appreciate canned tomatoes in January (usually ones I’ve put up myself), I find no reason to use them now, when I can simply boil some water, quick blanch, slip the skins and voilà, better than canned. So, I took those on the counter most needing to be used and did just that.
Moroccan Vegetable Couscous by Beth Dooley
- 14.5-ounce can diced tomatoes
- 1 15.5-ounce can garbanzo beans, drained and rinsed
- ½ cup canned or boxed chicken or vegetable stock
- 2–4 teaspoons jarred curry paste, or more to taste
- 1 10-ounce bag frozen vegetables, thawed
- 1 tablespoon lime juice or more to taste
- 2 cups couscous
- Coarse salt and freshly ground black pepper
- 2 tablespoons olive oil
- 2 ½ cups boiling water
- 1 cup Greek-style whole-milk yogurt or feta cheese
Combine the tomatoes, beans, stock, curry and vegetables in a large pot over high heat. Bring to a boil, reduce the heat to a simmer and cook until the vegetables are warmed through.

Moroccan Vegetable Couscous
Into a large bowl, mix the couscous with a pinch of salt and pepper, and stir in the olive oil with a fork to coat evenly. Stir in the boiling water, cover and let stand for about 3 minutes; remove the cover and break up any clumps.
Serve the vegetables over the couscous and top with the yogurt or crumbled cheese.
MY NOTES: First, as mentioned, no canned tomatoes. Since the tomatoes I used included some heirlooms, they had a decent amount of moisture, which worked well in this recipe for creating a perfect sauce.
I also didn’t have or want to buy frozen veggies, given all the things I need to use in my fridge, so here’s what I came up with (all grown in my garden):
- Eggplant – 4 very small ones, sliced and steamed
- Beet stems and greens – stems steamed, greens added at the very end
- Pepper – half a yellow bell, raw; whole Melrose Italian pepper, slightly steamed
- Onion – half a small one, raw
Continuing the list of substitutions, I didn’t have any chicken stock and my frozen veggie stock was in quart sized volumes, so I opted for some of the turkey stock I made and froze last winter, since it obviously needs to be used up too. I had frozen it in muffin tins, which generally are about a half cup, and then stored them in plastic containers – works pretty well and is much healthier than most store-bought stocks which are often chock-full of sodium.
For the garbanzo beans (aka chick peas), I soaked dry beans all day (about 12 hours, though you only need to do 6-8). I then put them right in the pot with the tomatoes, realizing later I should have boiled them for a bit to soften them. I actually decided to separate them all out and cook them, a rather tedious but worthwhile process, because I didn’t like the texture. Post cooking was definitely better.
The directions on this never really say when to add the lime juice, so I put it in the tomato-garbanzo bean mix, near the end of cooking.
Last, I cut the amount of couscous in half, as I knew we wouldn’t need the suggested amount, which really does seem like a massive amount of couscous.
Overall this dish has great flavor. I like it a lot better than another Moroccan Veggie Couscous recipe I’d gotten off a couscous box a few years ago. I love curry and being new to the world of curry paste, it was great to learn another way to use it, since this isn’t something I would normally have thought of. I also liked finding a way to use whole garbanzo beans, since I feel seriously “legume illiterate” and these beans are super healthy for you, high in protein and fiber. So, if you’re like me and enjoying the last bits of the harvest, try this recipe out with fresh ingredients, or save it until winter for a good warm-me-up meal on a cold day.
Taste the rainbow

Homegrown Rainbow – just add water
After harvesting veggies from our gardening earlier this week, I peeked in my bag and thought, wow, it’s like a picture perfect rainbow – bet it tastes just as good.
This thought then led me to think, it’s like you can “Taste the rainbow”… mmmm.
Sure, maybe I borrowed the tagline from a famous candy, but similar to the original Skittles® pack, the only color missing from my bag was blue, which is pretty impressive considering we’re talking Mother Nature’s coloring au naturel versus something made in a chem lab by the folks at Wrigley.
I think one of the most rewarding things about growing your own food is the immense variety you quickly discover exists out there compared with the minimal choices we actually have in the grocery store. I suppose if you walk down the processed food aisles at your average big box grocer, the appearance of variety and choice is impressive (never mind there are just a few huge companies that make all that “food” and most list high fructose corn syrup among the top three ingredients – that’s a discussion for another day). But when you really examine the options for fresh fruits and veggies, what we get in the store is pretty pathetic.
If you want to talk variety, just open a seed catalog from the great growers at Baker Creek Heirloom Seeds (I’ve mentioned them before when discussing heirloom beet seeds). Their catalog boasts over 1,300 varieties of heirloom veggies, fruits and flowers. That’s right, THIRTEEN HUNDRED.
In my own garden this year I’m proud to boast green eggplant, as well as several orange and yellow tomato varieties. One cherry tomato (Helsing Junction Blues) starts out green and blue and ripens to red and an almost blackish purple. In the past, I grew Gretel eggplant, which are a dazzling white. And have you ever seen Purple Dragon Carrots? It almost sounds like a fairytale.
This time of year especially, as the harvest peeks, it’s an unbelievable treat each time I enter the garden and know I am part of something bigger. An effort to remember and actualize the diversity of flavor, hardiness and beauty in our food system. A way of life that recognizes the importance of saving seed and making it available to all, not just those who reach the patent office first. And something that reminds us you don’t have to be perfectly round and red to be called a tomato.
Rosewater and Cardamom Yogurt Lassi
Until about a year or so ago, I had never heard of lassi, let alone tried it. When I finally noticed it on the menu at our favorite Indian restaurant (which, by the way, is Great India in Brooklyn Center, Minnesota), I decided to give it a go. I started with sweet lassi, as the salty option, while more traditional, didn’t sound as appealing. I loved it and the next visit I opted for the salty version. While I didn’t enjoy that one as much, I knew I was hooked on this wonderful yogurty goodness.
So, when I was skimming an article on ways to use yogurt this last week, I was instantly drawn to the recipe for “Rosewater and Cardamom Yogurt Lassi” and bookmarked it for making soon. I had no idea what rosewater was (though it seemed simple enough), but I guessed correctly that I could find it at our local Indian grocery store, Namaste Plaza. I had all the other ingredients including plain yogurt, sugar and cardamom, so once I picked up the rosewater, I was set to go.
MY NOTES: Yum.
Really, that’s all I need to say, but I’ll add a few notes about my process. For the yogurt, I opted for a mix of Greek and regular. No reason, other than I already had both for another recipe, so thought I’d give it a try. As the recipe suggests, lassi is also about the texture, so if you mix this up and aren’t quite ready to serve your beverage, I would suggest waiting to blend in the ice until just before you pour it.
A trio made in heaven: zucchini, eggplant and tomato
When I did an online search for “zucchini, eggplant and tomato” the results went on for at least thirty pages before I stopped clicking through looking for something that wasn’t a recipe. From ratatouille to gratin and ravioli to grilled kabobs, the possibilities of combining these three lovelies are endless. This time of year is an especially good time to try some of these recipes with all three of the leading ingredients in abundance in home gardens and farmers markets.
This morning I knew I needed to find a recipe to use the two Japanese eggplants I had harvested from our garden last week, so I did a quick search for eggplant on Pinterest. One of the most tantalizing options that appeared was called “Teglia Di Melanzane, Zucchine E Mozzarella Di Bufala” which roughly translated to “Pan of Eggplant, Zucchini and Mozzarella.” Yum.
After reading the translated ingredient list, I knew I had all I needed except fresh mozz. Luckily, I had heard from a friend they were having a 2-for-1 sale on fresh mozzarella logs at one of the grocery stores, so I stopped by and got four. 🙂
")
Tomato sauce in the bottom of the baking dish.
Here is the rest of the ingredient list:
- 2 eggplants (360 gr)
- 2 zucchini (300 g)
- 360 g red tomatoes
- 12 slices of mozzarella 1 inch thick
- 1 clove garlic
- olive oil
- basil, chopped
- salt
- freshly ground black pepper
Here is my edited version of the translated instructions:
Wash the eggplant and cut into slices one centimeter thick. In a bowl, cover the slices with coarse salt and put a weight on top. Let stand for about an hour.
Wash the tomatoes and score the skins. Boil a pot of water and add the tomatoes. After about 20 seconds, remove and peel the tomatoes. Remove all the seeds and chop.
In a skillet, saute the garlic in a tablespoon of oil. Pour in the diced tomatoes, reduce heat, add salt, cover and cook for about ten minutes. Turn off the burner and add the basil.
Rinse the eggplant slices.
Wash the zucchini and cut them in slices.
Preheat the oven to 180 degrees (this is 350º F).
Brush the zucchini and eggplant with oil and saute in a hot cast iron skillet.
Pour a little oil on the bottom of a baking dish.
Place the tomato sauce on the bottom. Arrange alternating slices of eggplant, zucchini and mozzarella on top of the sauce.
Bake for about 15 minutes or until the cheese is melted. Remove from oven, pour a little olive oil, pepper, garnish with fresh basil and serve.
") MY NOTES: This recipe was very easy. It takes a bit of time to wait for the eggplant to “sweat” but otherwise, it is pretty “low tech” and fast. For the garlic, the original translation said to remove the garlic. Maybe that didn’t come across from the Italian correctly, but I can’t imagine any reason to remove garlic, so that stayed in. It also said to add “one leaf” of basil, which seemed silly, so I added about three tablespoons.
MY NOTES: This recipe was very easy. It takes a bit of time to wait for the eggplant to “sweat” but otherwise, it is pretty “low tech” and fast. For the garlic, the original translation said to remove the garlic. Maybe that didn’t come across from the Italian correctly, but I can’t imagine any reason to remove garlic, so that stayed in. It also said to add “one leaf” of basil, which seemed silly, so I added about three tablespoons.
The taste on this dish was excellent. Smooth, salty, rich from the oil, but also very much something I would describe as friendly for many palates. Like ratatouille, but in a casserole dish. Overall, a perfect choice for a late summer dish for the whole family.
